This week, we will see how we can use javascript to create simple animations on your web page.
To demonstrate this, I'll be creating an animation of a running man where the user can:
- control the speed of the animation
- change the direction of the animation, and
- throw obstacles at the runner
I will also demonstrate some simple collision detection techniques such that the animation does not 'run off' the screen but rather 'bounces off' the edges and changes direction.
The HTML
For this task I wanted to split the page into two sections, the top section will serve as a 'canvas' or boundary for the running man animation while the bottom section will display all the necessary controls.
To do this, I will create two <div> elements named 'canvas' and 'control panel' where the former will contain the running man image and the latter will contain the controls:

The controls are a combination of HTML anchor elements, styled to look like buttons, and a 'select' element to allow the user to change the animation speed from a drop-down list. The controls are laid out using an HTML table and after some CSS styling this is what the page looks like:

The focus of this blog is the javascript code behind the animation so I will not be going into detail on how the page has been laid out and styled. The techniques used have all been covered in my previous posts.
The Code
As a basis for my animation I will be using 11 images (or frames) each of which is showing the man at a different 'stage' in the run. The principle behind this animation is to change the source of the image element over time, displaying each frame in sequence, to simulate a running man.
So, let's get started. The first thing we need is an array to store the path of each frame in the animation:

Line 11 defines a new array called 'rightRunner' which is populated using a for loop. Each element in the array now represents a different frame in the animation. I chose to call the array rightRunner because initially, the man will run to the right.
Next we need a method that will change the source of the animation image:

Each time the marathon() method is called, the src attribute of the animation image changes to the next frame in the array. The curRunner global variable is used to keep track of the current frame and whenever it reaches 10, it is reset to 0 such that the animation loops from the begining. For the animation to work, we need a way of triggering this method over time and the 'setInterval()' javascript method allows us to do just that. The setInterval method requires two parameters: a reference to the function to be executed and the interval (in milliseconds) between function calls. We can also use the 'clearInterval' method to stop the animation.
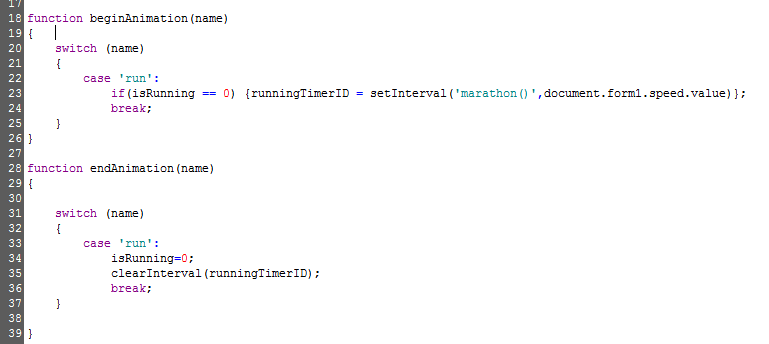
The above code snippet shows the two functions I will use to start and stop the animation(s). Since I will be adding more animations later, I'm using switch statements to determine which of these animations to start/stop. Line 23 calls the setInterval method on the 'marathon()' function and the interval is set to the selected value of the animation speed drop-down list box. The returned ID is stored in the runningTimerID global variable which is then used to stop the animation at line 35. I am also using the 'isRunning' global variable to ensure that the animation is started only once. Next I will wire these two functions to the start and stop buttons:
We now have the basic animation in place upon which we can start adding the other features.
Adding Movement
At this stage when we start the animation the man seems to be running on the spot. We will now add movement to make the animation more realistic. To achive this I will be changing the position of the image during the animation to give the impression that the man is running around the screen.
First we need to make sure that the image is 'absolutely' positioned on the screen by setting the 'position' CSS property of the image to 'absolute'. This will allow us to explicitly set the X and Y co-ordinates of the top left corner of the image to the position we want.
Next we need a function that will set the direction of movement and depending on the direction, we will need to add or subtract from the x and y co-ordinates of the image.

The 'setDirection()' function above changes the value of the 'xMultiplier' and 'yMultiplier' global variables depending on the selected direction of movement. (This function is wired to each of the directional buttons in the control panel shown in the screenshot at the top of this post.) I can now use these multipliers to determine whether to increment or decrement the x and y co-ordinates of the image in the 'marathon()' function:

Now, whenever the marathon() method is called we first get the x and y co-ordinates of the image through the 'left' and 'top' css style attributes. Then we add or subtract 10 pixels from these values depending on the x and y multipliers and set the new values, effectively changing the position of the image. I also added a new array of images called 'leftRunner' to be used when the image is moving towards the left. These images are horizontally-flipped copies of the original images used so far. You may also notice that I'm using a 'getValue' function to get the position of the image. This small function basically removes the "px" suffix from the value of the left and top attributes.
Collision Detection
So far we have an animation of a man running around the screen where the speed as well as the direction of movement can be changed at any time. We now need to add some simple collision detection to make the animation change direction whenever it hits an edge of the screen instead of running off it.

The collisionDetect() function is called from the marathon() function just before calculating the image's new position.
We now have an animation of a man running around the screen, bouncing off the edges and changing direction automatically.
In my next post I will add the functionality to throw obstacles at the runner and look at how we can use DOM from javascript to manipulate the document.
 Subscribe to email feed